Thread Rating:
  • 2 Vote(s) - 4 Average
  • 1
  • 2
  • 3
  • 4
  • 5
Rooistes
#31
I have made a bit of progress with a new grill. Due to the fact that most of the second hand grills that I have looked at are aesthetically worse than mine, I tried to make one. My first attempt (posted before) was less than successful. My most recent attempt included sending drawings, measurements and my old grill to an engineering company, who laser cut a new grill and CNC bent it. This is the result: 


I have also cleaned and / or chromed a few more parts:
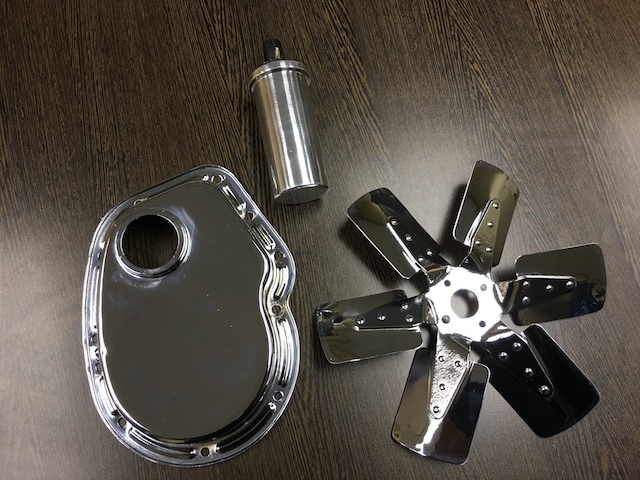
   
Gregory
It is what you think you know already that prevents you from learning.
I am here to learn. Teach me.
[-] The following 2 users Like gweir's post:
  • Thumz, Vinay-RS
Reply
#32
I love the look of that grille and the plated components. Your engine bay is going to look exquisite when you put it all together.
[-] The following 1 user Likes Vinay-RS's post:
  • gweir
Reply
#33
Thanks Vinay. Tried to fit the grille today. Unfortunately, the size (height) if the grill is smaller than it should be. I checked the measurements that I gave them, which were correct. They obviously need to adjust the design on their side.  Well, back to the drawing board.  Let's hope for third time lucky.  When I have a decent prototype, I will make the details available of the engineering company for the benefit other Clubby owners. I will also ask them about various metals (for the weight conscious amongst us).

1st attempt (Aluminium - very different from original grill - similar weight ) 


2nd attempt (Rolled steel - closer to original - 1 kg heavier) 

   
Gregory
It is what you think you know already that prevents you from learning.
I am here to learn. Teach me.
[-] The following 1 user Likes gweir's post:
  • Vinay-RS
Reply
#34
School holiday meant that the whole team could contribute to a bit of work on Rooistes today.

Progress: 

1. Ordered and received coil spring for conversion of front and back suspension (www.7ent.com)
2. Bought 13" rims and tyres (Autostyle)
3. Adjusted design and sizes for grill and sent it back to the engineers
4. Sanded back subframe (Stephen Jnr)
5. Started preparing the underbelly of the beast for rubberising - huge amount of gunk and grime - to be continued
6. Body work and sanding and primer (Stephen Snr) - to be continued
7. Took Smith's speedometer and tachometer in to Sun Speedo Services in Benoni work service and calibration
8. Had backboard cut to size from marine plywood (backboard covers spare tyre in boot of Estate)


https://youtu.be/qIPgKP3g7DA


Gregory
It is what you think you know already that prevents you from learning.
I am here to learn. Teach me.
Reply
#35
I like those wheels. Grille looks good as well. How will you add the curvature into the grille to fit the body?
                                                                            Mk3 Full Build Thread
                                                                    [Image: XLqVNZw.jpg?1]
Reply
#36
Those are some awesome purchases. Lovely wide wheels and those coil springs look really cool!
[-] The following 1 user Likes Vinay-RS's post:
  • gweir
Reply
#37
(07-15-2017, 03:59 PM)Jared Mk3 Wrote: I like those wheels. Grille looks good as well. How will you add the curvature into the grille to fit the body?

Thanks Jared.  As far as the grille is concerned, I will have to saw into the top and the bottom if the grille and bend it to the correct angle after applying heat with a blow torch.  I hope it will be as easy as that, but time will tell.

   
Gregory
It is what you think you know already that prevents you from learning.
I am here to learn. Teach me.
Reply
#38
I hope it works out Smile

*1000th post for me*
                                                                            Mk3 Full Build Thread
                                                                    [Image: XLqVNZw.jpg?1]
Reply
#39
Looking good man.

Do you have a lot of weights to balance those wheels out?

The yellow dot should line up with the valve and then less weights should be used to balance the wheels.
[-] The following 1 user Likes DomMINIque's post:
  • gweir
Reply
#40
(07-19-2017, 03:55 PM)DomMINIque Wrote: Looking good man.

Do you have a lot of weights to balance those wheels out?

The yellow dot should line up with the valve and then less weights should be used to balance the wheels.

Thanks Dom. I did not know that at all. Will sort it out ASAP.

Busy day at the Weir Homestead. We couldn't find a cow to tip, so we tipped over an Estate in stead. 


Notice the home made adjustable hi-low's (arrows).  We tipped the Mini onto a foam mattress on top of an inflatable mattress, which were all covered


Gently onto its side. I did not like it a bit!


Degreased with a mixture of CleanGreen, paraffin, hard bristle broom and elbow grease.


My Dad started on the doors and bonnet


After cleaning the underside as well as we could, I applied Durabak. I did a bit of research and decided on this product. I liked the fact that it bonds to itself and can be repaired with brush application. I guess time will tell...

http://www.duram.co.za/products/durabak-2/


Team Weir hard at work.  Special times!
Gregory
It is what you think you know already that prevents you from learning.
I am here to learn. Teach me.
[-] The following 1 user Likes gweir's post:
  • Vinay-RS
Reply


Forum Jump:


Users browsing this thread: 2 Guest(s)